


I am not a professional, I just happen to take a lot of photos
Try different lenses
For a beginner, interested in photography, you stick to what we have at close reach and what is the easiest, (unless that’s what I did for many years). I didn’t understand the complexity of lenses until I actually sat down and tried the ones that my school had available. Prime lenses (fixed focal length) are your best friend! I know it can be daunting to stick to just one focal length but I sweat it’s worth it. The quality that you get with prime lenses is incomparable. With zoom lenses you actually lose a lot of the light that get through it since it has more glass element. So, make sure you try prime ones, you usually have the chance to have less depth of field (shallow background) and nicer lighting.
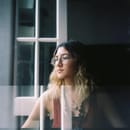
Wait for the natural lighting
If you are anything like me, hate studios and are lazy ass to check out artificial lighting from the media center, wait for that natural lighting. Plus, cloudy days can be great for portraits since you don’t get hard shadows. If you shoot at the right time and right location where the sunlight finds your subject just right, especially in portrait photography, magic happens. Don’t settle for cloudy days unless that’s what you want, natural lighting is pretty.
Leave your neighborhood
First of all, go outside! Photos from your apartment’s window with a telephoto (very zoomed in) don’t count as street photography. And if you go outside, don’t stick to just your neighborhood, especially if you live downtown. Go explore, go somewhere you’ve never been, talk to locals, ask them about their favorite spots, take the train, take the bus and look out the window till you see something you like and get off.
Don’t take pictures of homeless people unless you ask
This has been a debate that I’ve come across quite a few times in my college career every time someone comes to class with photos of homeless people and here is my point of view. In my opinion, you can take photos of homeless people, but not in the same way you would take a photo of a random person walking to work. Homeless people don’t have a private space that they own and they are not part of the city.
I recently came across someone that was presenting a series of photos, one photo was of a firetruck, another was a building and the last one was a homeless person on a corner with his head down. Someone might argue that they are showing the unfortunate situation that person is in and are trying to create awareness, but the problem is that the artist didn’t approach them. If you want to take a picture of a homeless person, approach them, offer to buy them a meal, ask them how their day is going and then ask if you can take a picture them, it’s the least you can do.
Edit your photos
I know you think your photos are great, they are, but they can be better. Give photoshop a try, you’ll get the hang of it quite easily, I promise.
Don’t go raw, use RAW.
I know RAW files can be annoying, they are big files that drain your memory card that you need to take time to convert. If you plan on editing pictures or any post-production changes, then you must use RAW. If you are in low light situations especially, RAW files capture a lot more information than a regular JPEG, so it’s a lot easier to save your photos if they are underexposed. Plus, you can use the RAW editor on Photoshop which makes everything easier, I recommend it 10/10.
Oh, and use condoms.
Try Film photography
For most of my photo path I’ve done mostly digital photography and I love it, don’t get me wrong, a lot of these tips go towards that. But, film photography is honestly very cool, it requires a bit of money but you can find very good deals online for a bunch of film and developers. Kentmere, Kodak and Illford can be cheap, and if you learn how to develop through Youtube you don’t have to spend $4000 on a college class like me ;). Film photography is great experience to pay more close attention on the content that you choose to capture since you have a limited amount of photos per roll of film. It also helps you better understand how exposure works since a lot of them don’t have an automatic mode. And finally, they are just very pretty and “edgy.”
Take it or leave it.