

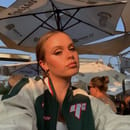
The recent hype surrounding Pamela Anderson has been incredibly hard to ignore since the release of the new Hulu show, Pam and Tommy. The new biopic series shines a light on the star’s tumultuous past relationship with Motley Crue drummer, Tommy Lee. It’s been 27 years since Anderson and Lee’s promiscuous and private home movie was stolen from a safe in their home and widely distributed, painting Anderson in a poor light due to her involvement with raunchy editorial features in Playboy. But promiscuity aside, the name “Pamela Anderson” along with the blonde bombshell’s looks cannot be forgotten.
With the release of Pam and Tommy came a great rush of social media obsession for some of Anderson’s most recognizable hair and makeup looks. Most notably, her smokey eye and dusty pink lip combo with a messy and free up-do have entered the mainstream. Now, I am not an expert in makeup and hair. But the best part about re-creating this look is you don’t have to be a pro! With a few simple techniques, you too can channel the ultimate self-version of Anderson.
Makeup: What you’ll need
As I previously mentioned, this look is very smokey and sultry. Before we begin, here are some essential makeup products you’ll need, all from a brand of your choice!
- Foundation
- Concealer
- Powder
- Contouring products (cream or powder)
- Blush
- Highlighter
- Black and brown eyeshadow
- Light silver-toned or cool-toned shimmery eyeshadow
- Black eyeliner
- Black mascara
- Eyebrow pencil or tint
- Mauve pink lip liner
- Mauve pink lipstick
Now that you have your products, let’s get down to business. With a look such as this one, the dark eyeshadow is the messiest part. From my experience with this look, I started with the eyes first so that any fallout of black eyeshadow wouldn’t ruin my base.
Eyes
The best trick for this kind of look is using tape, good ole Scotch Tape. Take a piece and place it right under your lash line at an angle, as if you were creating an eyeliner wing. This will help create a cat-eye shape that adds sultry-ness to the look. Once the tape is down, begin to pack on concealer all around your eyelid and underneath your eyebrow. The concealer will act as the primer for your eyeshadow. Set the concealer with translucent powder and your eye base is done!
Now, we’ll move on to the smokey colors. It seems like Anderson always has some sort of smokey eye look going on and they range from subtle and soft, to bold and intense. For this look, I opted for bold and intense (which is way more fun). I started by picking a light, cool-toned brown shade from an eyeshadow palette (I used the Maddie Ziegler x Morphe Palette) and took a fluffy eye blending brush and swiped it into the crease of my eyes, softly blending it up and out along the edge of the tape. Once I created two layers of this, I moved on to a darker brown (I used the Morphe 35X Big Primpin’ Palette) and with a similar blending brush, lightly focused on the outer corner of my eye and softly blended it about halfway into my crease. The key with the darker colors is to be light-handed with them while blending to ensure a smooth application.
I know that when I see a black shade in an eyeshadow palette, I start to worry. Black is hard to control and if you’re not careful, it can look harsh or messy. To avoid that, start with a small angled brush (like an eyebrow brush) and dip it into the black shadow. Create a wing along with the tape and then connect it back to your upper lash line, slowly extending the line until it reaches your inner corner. Go slow to ensure the line is smooth. Next, take more black shadow on the same brush and starting from the tip of the wing, drag the black into the outer part of your lid and crease. Take the brush you used earlier for the dark brown shade and blend as you go. Keep dragging the black over from the wing to darken the eyes, but leave half of your lid blank. Once most of your lids are smoked out, take a tiny bit of a matte nude shade and lightly tap it on the blank space of your lid. If you need to, go back and darken the black lining of your upper lash line. Lastly, add a hint of a shimmery shade on top of the nude shade. Finish it off with mascara or a pair of fake lashes and you’re done!
BONUS: For extra smokiness, add a black eye pencil to your tight line and waterline.
Face
You may think that there’s not a lot that goes into achieving Anderson’s face makeup, and you’d be right. The girl keeps it smooth and simple with a hint of glow to her cheeks.
To achieve smoothness, start with a blurring primer. I used Elf’s Poreless Face Primer and focused on blurring my cheeks, forehead and chin. For foundation, I used a sponge to pack on L’Oreal’s Infallible Fresh Wear 24HR Foundation, an all-time favorite of mine that leaves my skin looking fresh and never cakey.
To achieve part of the angelic glow that Anderson has, concealer comes in handy. After I applied my regular concealer, I applied an even lighter shade just to the inner corner and outer corner of my under-eye. This technique ensures an even brighter under-eye, much like Anderson has.
When it comes to brows, Anderson has very skinny brows. I’m talking very skinny. As much as I love that look for her, I can’t bring myself to shave off my brows or cover them with glue, powder and layers of foundation. For this look, I stuck to my usual brow shape and products. First, I brushed the hairs upwards to find their natural shape. Next, using my L’Oreal Brow Stylist Definer, I filled in my brows and darkened sparse areas. To hold them in place, I used the Maybelline Great Lash Mascara in clear.
This next step is totally optional. Anderson has beautifully sculpted cheekbones; something that I don’t have. But what’s great about makeup is it can create what isn’t already there.
“After that, it’s a little paint’ll make you what you ain’t,” Pam and Tommy head makeup artist David Williams told USA Today. “Highlights, shadows, contours that enhance the prosthetic, that change structure.”
When going for extremely chiseled cheeks, I used a cream contour. Along with the Elf Putty Bronzer, I used a small brush to paint a line of the cream right where my cheekbones fall. Then I blended upwards with a sponge to ensure a seamless finish. Anderson has slightly rounded cheeks, so at the end of the line, I flicked to cream upwards as if to create more of a plump shape for my cheeks.
Finally, set your entire face with a loose translucent powder or pressed powder of your choice. Using my Wet n Wild Photo Focus Loose Setting Powder, I pressed it under my eyes and then dusted it over the rest of my face to seal everything in.
To create a more chiseled look, take a matte bronzer and lightly brush the powder up from where your cheekbones are. Take an even lighter amount and softly brush it onto your temples, across your forehead and along your jawline and neck. To mimic Anderson’s rosy cheeks, softly swipe some blush upwards on your cheekbones and slightly on the apples of your cheeks. A personal favorite of mine to add a little glow is the NARS Orgasm Blush.
My favorite step to do before I apply a highlighter is to spray my face with setting spray. After I use the Milani Make It Last Setting Spray, I fan my face to help it dry and then on a small fluffy brush, I lightly tap highlighting powder onto points where light naturally hits my cheeks, nose and upper lip.
Lips
There’s not a lot that goes into Anderson’s signature lip look. The biggest aspect is the contrast in colors she uses. For lip liner, her lips are lined much darker than the rest of her mouth, which is painted with a lighter shade of mauve. I did not have either of those shades, considering they look less than appealing with my skin tone. But hey, if I had my pick for lip liner, I’d choose the NYX Slim Lip Pencil Creamy Long-Lasting Lip Liner in Citrine and pair it with Revlon’s Lustrous Lipstick in Champagne on Ice. Slightly overline your lips with the liner and blend the lipstick and liner after application. Finish it off with a clear gloss or keep it the way it is!
Hair
I do not have blonde hair, nor do I have bangs like Anderson. But that didn’t stop me from trying to recreate her messy bun-looking hairstyle with strands galore. I learned that this hairstyle works best if you have second-day hair or hair that isn’t freshly washed. If you have naturally wavy hair, then you’re pretty much set for this style but for those that don’t, feel free to add some tight curls into your hair before tossing it up. Start to pull your hair up as if you were about to twist it into a top knot. Then, take your hair and loosely twist it creating a very floppy and messy bun shape on top of your head. I have a lot of hair so I used a lot of hair clips and pins to help it sit right. Once I had it secured, I started pulling strands out to make it even messier. To pay my respects to Anderson’s bangs, I pulled a few long strands out around my face to frame the look.
BONUS: Add texturizing spray or powder to add volume and body.
That is how to create Anderson’s iconic smokey eye, pink lip and carefree hair! Feel free to get creative and put your own spin on this famous look inspiration. Experiment with your own products, try out different shades and compare looks with your friends.