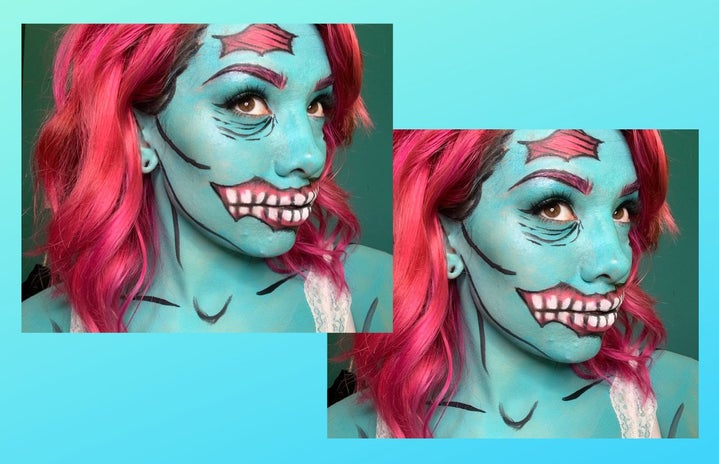
We all love a good witch, angel, cat, or classic zombie costume for Halloween. You just throw on clothing you already own in all black or white, buy some lingerie, or throw some fake blood on a tattered old t-shirt. Then do your makeup the way you usually would for a night out – maybe with an odd coloured lipstick. But if you’re ready to step up your makeup game this Halloween, let me introduce you to body paints.
Basically, body paints are an easy way to go from a person wearing themed makeup, to a full- blown character. There are many different kinds, but if you’re just picking them up for Halloween, you’re probably going to get cream paints or water-activated paints.
Cream paints are great because they’re ready to go from the pan or tube. Similar to a cream contour or blush, you can layer them on top of each other and blend them together. But they don’t set down on their own, so they have a tendency to slip around, and they can cause your skin to break-out. These are the kinds of body paints you see at the dollar store in October, but you can also get them at Halloween stores, professional makeup stores, and of course, online—they’re usually pretty cheap.
The other option, water-activated paints, work just as described: you need to mix them with water to use them. The great thing about this is that you can adjust how opaque you want the colour to be by adding more or less water. As long as you don’t make the paint too runny, they allow a lot more precision than cream paints, and they’re also easy to wash off (just soap and water). The downside is that since they’re water activated, they don’t layer over each other very well, and they will also start to come off with rain, sweat, or your friend Kyle spilling his beer on you for the third time that night.
Despite their flaws (the paints, not Kyle), water-activated paints are my go-to. I’ve never seen them at the dollar store, but you can find them at Halloween stores, professional makeup stores, online (duh), and even at some dance stores. They’re usually more expensive than cream paints, but the product tends to last longer. Kryolan and Graftobian are some of the best brands, but Mehron is a good mid-range brand. Single pans go for about $10 to $15, basic palettes are $30 to $50, and full-blown pro palettes are around $100.
Now, how the heck are you going to go about this? I’m going to focus on water-activated paints, but you can use these instructions as a guide for either kind.
- What You’ll Need
-
Whichever kind you choose, you’re going to need some basics:
1) Brushes—clean paint brushes (the kind from art class) and/or your usual makeup brushes will do)
2) Body paints — cream or water-activated
3) Water — if you chose water-activated paints
4) Eyeshadow palette, eyeliner, mascara, highlighter
- Map Out Your Look
-
Map out any shapes you know you’re going to want on your face. I just looked up “cartoon zombie” and used a few of those photos as references.
My eyebrows are blocked out with white to conceal my naturally dark eyebrows, and prepare them for some hot pink action later.
The random black shapes are going to be torn skin to reveal a different colour underneath.
I also mapped out the teeth to get the hardest part out of the way. A small rounded eyeshadow brush worked perfectly for that step.
It’s especially important that you do this step first if you’re using water-activated paints, so you can get crisp lines and avoid having two colours blend into each other.
- Fill in the Blanks
-
Now that you’ve got your roadmap, fill in any areas that are going to be one block of colour.For me, that’s a teal face with pink flesh. I left my eyelids blank because I wasn’t sure what I wanted there yet.
- Add the Glam
-
Start bringing out depth in your face by contouring your face with a darker colour than your base. I used a darker teal under my cheekbones and on the sides of my nose. I added a green-tinted highlighter to the tops of my cheekbones, my brown bones, and the bridge and tip of my nose. Then I went in with a black eyeshadow to darken the edges of the pink areas. I stuck with a blue-green theme on my eyes, and finished it off with winged eyeliner and mascara.
- Get Detailing
-
Here’s where you want to add any precise black or white lines. Again, I’m using a few reference photos as a guide for where to place all these lines. My look could have benefited from some pure white highlights, so that’s something to try next time.
- Final Product
-
And that, my friends, is a finished look. You can definitely put some translucent setting powder and/or setting spray over this to extend its life, and be sure to avoid Kyle when he’s on his fifth beer.
Happy Halloween-ing!


